Table of Contents
This series is designed to help people to understand modern technology, and become more confident in using computing devices. It is not designed to educate experts.
The author is involved in tutoring older students at SeniorNet, a New Zealand wide organisation. SeniorNet hopes that students will feel more confident in using their computing devices as a result of the learning opportunities offered. This series of articles shares that hope.
Google Goodies
We think of Google as the search engine company. But they provide us with so much more. Gmail and YouTube are two more major services, and there are others. I like to use their services for my own ends, and here are two I use that you could find very handy.
Google and the power of Plus (+)
First up I’m talking about Gmail. Gmail is almost ubiquitous. You find it on desktop computers, tablets and phones. It’s a good system, and I will show you how to make it better.

Trick 1: You can have an endless supply of Gmail addresses by using this trick. Simply add “+” and a descriptive just before the “@” symbol and you effectively have an email address for that purpose.
For example, say you want to sign up for a service that emails you a new recipe each day. When you supply your email add the extra like this : myemail+recipes@gmail.com. Gmail will disregard the +recipes portion of the address and drop the email into your inbox as usual. If you find emails arriving with this address from other services you will know your email has been sold.
Send yourself an email using the new address to make sure it works (you will need this email for trick 2).
Trick 2: Use this in association with trick 1. Set up filters and folders (Gmail calls them Labels) and sort your emails automatically as they arrive. You can’t do this for tablets and phones, but don’t worry, I’ll show you how shortly.
On your computer go to Gmail Log in. From this page log into your Gmail account and locate the email you sent yourself in your inbox (see trick 1).

Select the test email by ticking the box (1 above). Then click on the label icon (2 above). In the dropdown “Label As” box type a label name. In our example I might use Recipes. Click Create New, and Create on the pop up. You’ve now created a home for your selected emails.
Click the More icon (3 above) and click Create Filter. Delete the “From” address and in the “To” address type the new address (including +recipes).
Click “Create filter with this search »” and in the pop up select “Skip the Inbox (Archive it)” and “Apply the label:”. From this box using the drop down select the Label you want (in our example “Recipes”).
Click Create Filter button and you’re done creating the filter. Now click the trash can icon (above the circled 2 in the above graphic) to delete your test email and you’re finished.
From now on emails to this new address will drop straight into this label (folder), and the label will be replicated on your email app or client. And they won’t clutter your inbox.
Phone and Tablet Users.
Unfortunately you can’t do the foregoing from your Gmail app. You can however use the browser in “Desktop Site” mode. To do this start your browser (probably Chrome), and Log in to Gmail ,click on the three dot icon, scroll down and select “Desktop Site”. Then proceed as described in trick 2.
Once completed emails to this new address will drop straight into this label, and the label will be replicated on your email app or client. And they won’t clutter your inbox.
Editing Filters.
You can edit filters when logged in to the Gmail site by clicking on the gear wheel icon (towards the top right of the page), clicking “Settings” and then the “Filters and Blocked Addresses” link. You can edit, delete or create new filters from this area.
Bonus Hint: Use filters to control your email inbox. Set up new folders (labels) and direct the emails to the new folders. I use filters extensively because I receive a large number of emails.
You and your secretary typist.

In the thirties and forties it was standard that the big boss, in the corner office, would have a secretary who took dictation and then typed up his (they were always men) missives. Those days are gone, and it’s no longer PC to “have a girl”.
Have you ever wished you could return to those days and have your own private secretary and typist? Someone who could take dictation and then provide you with the typed work. Well, have I got news for you. You probably have this already, and just don’t know it.
To use this facility you will need the following:
- Internet connected laptop or desktop computer (not a tablet or phone, but don’t despair, you will be able to join in, see further down);
- Chrome or Chromium browser (Chromium is Chrome without Google’s tracking code);
- Computer with microphone input;
- A Google account ( if you have Gmail you have a Google account).
Get started by logging into Google Docs and select a blank document. Click on the “Tools” menu item and select “Voice Typing”. A microphone icon will appear at the top left of your screen. You may be asked to give permission to use the microphone and if so do this. Then all you need to do is click the microphone icon and start to dictate. You may need to adjust the level of your microphone input to get clear typing but apart from this, there is no training necessary. Some of the commercial products require extensive training but this particular system appears to be pretty good straight out of the box. It is not perfect and you may need to do some corrections after you have had your dictation converted to text. As I’ve said above the microphone level may need adjusting and you may also find if you are in a noisy environment the microphone will pick up extraneous sounds which could make things more difficult.
There is an extensive help page here, covering not only punctuation but editing as well.
As a free tool this is an excellent addition to your toolbox. With some practice you’ll easily be able to dictate blocks of text and perhaps even get started on the great New Zealand novel.
Once your work is complete you can use the File / Save menu item to save your work to your computer, perhaps for more formatting using your normal word processor. Your work can be saved in several formats including open document format used by LibreOffice.
I suggest you give this a try and see if it is going to help you produce written work.
1st Bonus Hint: You can also dictate your Gmail emails if you use the browser web interface. Install the “Email Dictation” extension into your Chrome or Chromium browser. Then when you are writing an email just use the controls you will find on your screen as shown below.
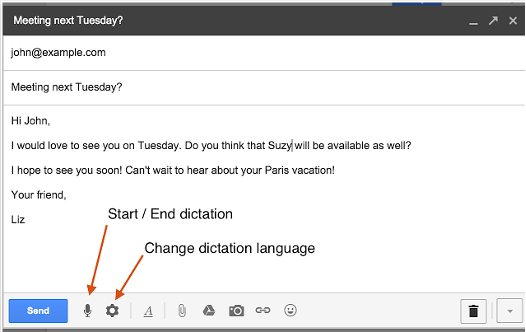
A couple of caveats. You can’t voice input the address or subject, and the system will misspell many real names.
But nevertheless a quick and easy way to produce an email which can sound more natural than a straight typed email. Try it.
2nd Bonus Tip: This YouTube video shows how to install extensions on Chrome or Chromium browser. Search for Email Dictation to locate the extension.
On my Linux system it’s different than shown. I go to Customize and control Chromium/Settings/Extensions.
Note. Many extensions are free, some require payment. Email Dictation is a free extension.
Phone and Tablet Users: You can do this easily. Just go to the Play Store (Android) or App Store (Apple) and install the Google Docs app. Make sure voice input is turned on (here is a YouTube video). Log into Google Docs, select a blank document, click the microphone on the keyboard and away you go.
Caveat. I don’t have an iPhone to test this on. Could an iThing owner try it and comment below.
Use the comment section of this article to tell me what you think of my efforts to bring enlightenment to the masses.
If you enjoyed this BFD article please share it.


