
Table of Contents
This series is designed to help people to understand modern technology, and become more confident in using computing devices. It is not designed to educate experts.
The author is involved in tutoring older students at SeniorNet, a New Zealand wide organisation. SeniorNet hopes that students will feel more confident in using their computing devices as a result of the learning opportunities offered. This series of articles shares that hope.
I use an Android smart phone, and have for some years. Whenever I’m dealing with a new user, there are several things that we need to sort out right from the start. Things that annoy or frustrate a new user.
But firstly, let’s understand a little about Android, the “engine” that runs your phone.
Android is developed by Google. “Don’t be evil” was a phrase used in Google’s corporate code of conduct, which it also formerly used as a motto. This was effectively shelved in 2015, so you should always proceed in the expectation that Google will not actively put your interests ahead of its own. Always proceed on that basis, and you won’t be unduly depressed.
The Android system is built on top of the open source Linux operating system, and that part of Android is therefore subject to the GNU General Public License (GNU GPL or simply GPL). But Google also includes proprietary code called the blob, and this contains who knows what (I suspect it contains tracking code and other code advantageous to Google being able to serve ads onto Android devices). Proceed further on that basis to avoid being surprised.
That being said, it is still provided free and that price is a good buy. But you must decide if the loss of your privacy offsets the dollars. And none of its competitors is likely to spy on you less!
Each phone builder takes the stock Android system and adds its own style. This can mean different stock apps (or junk apps), different icons, different screen layouts or launchers, and other differences. Even though you’ve used Android phone make A, when you move to a different make (or even a different model from a familiar maker), expect there to be differences. There are lots of different makes and models. Samsung is the best known, and I use one of their cheap models (Samsung Galaxy A12, which has now been superseded by a newer model, the A13). This model does most of what I need, but will not make contactless payments. A big problem is that often when you buy a phone you often don’t know what you might want to do in the future.
Now that you know a little about the phone’s engine, let’s move onto what frustrates new users.
1. Charge it!
Charge up your phone before you use it. Most phones come with a charge in the battery, but it’s good form to fully charge it before first use. Here is the first annoyance. Some new phones (I’m looking at you, Apple and Samsung) now don’t include a charger, and this is an extra purchase. Check when you purchase! A Momax charger from PB Tech usually costs about $34! Noel Leeming charges $45-50. JB Hifi has a bigger range from $21 up.
2. The Screen Goes Blank.
The next frustration that new owners of a smart phone encounter is the screen switching off when you ignore it for a few seconds. I’ve seen this many times. Someone comes to me grasping their new phone, incandescent with rage because the screen goes blank after a few seconds. The maker does this so they can boast how long the battery lasts. It’s easily fixed.
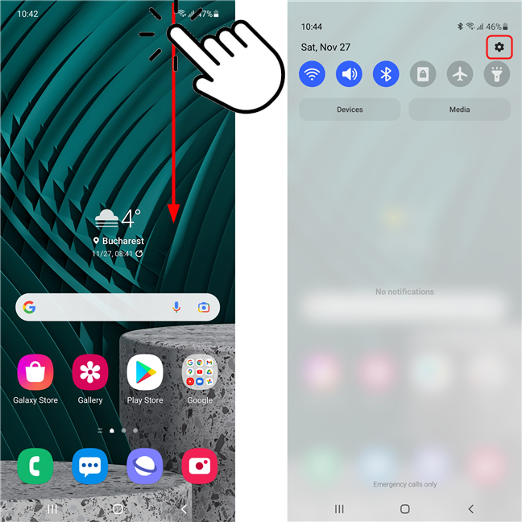
There is a setting in the Settings area to change this. Most Android phones will allow you to get to the Settings area by stroking down from the top right side of the screen.
This will reveal the Settings icon, which is outlined in red in this graphic. Tap the icon to open the Settings area.
Or you may find an icon (see the following) on the screen that will open the Settings area.
The Settings icon may look like one of these, or something else.

As you can see, you may not recognise it right away.
Note: There are often multiple ways to do something. Because different makes adopt different strategies I may offer more than one course. Just pick the one that works for your device.
While we are talking about it, new and inexperienced users need to understand there are three ways to interact with their screens.
a. Tap. A light tap with the end of your finger.
b. Stroke. Stroke lightly with the tip of your finger.
c. Press and hold. Hold the end of your finger on the screen for a few moments.
How firmly should you tap, stroke or press? Very gently. Imagine your phone is your girlfriend. That gently!
And I make no apologies for imparting this most basic of information. Everybody was a beginner before they knew what they now know. If you are ever asked by a new user for help, take your time with the explanation, and demonstrations. And if you are talking to an older person, be more patient. Remember, without your grandparents you would not exist!!
Now back to our problem. Tapping the Settings icon should have revealed a settings menu. Stroke up the screen until you see a heading (doing this will probably be called scrolling in most instructions). On my phone I look for a heading called Display, but yours may vary. Screen is another popular variation. Tap on this heading.
You will be presented with a sub menu. You need to find (by scrolling) the heading that says either Screen Timeout, or something that means the same thing. Tap this to reveal a second sub menu. Now tap to select how long your screen will remain visible if you don’t interact with it. I usually set this for 5 minutes for new users. New users take longer to decide what they want to do. Once they become more proficient this timeout can easily be reduced.
Once you have changed this, return to the first screen you saw, called the Home Screen. Do this by tapping on the small box or circle icon at the centre bottom of your screen. If this is missing, stroke up from the bottom middle of the screen. This means that gestures have been set on your phone, more “modern” but something I personally don’t like. I’m not going to discuss gestures.
Let’s quickly review what you’ve learned so far.
Icons may look different on different phones. Things may have different names. Tapping. Stroking. Press and hold produce different results. How to get to your settings area. How to reveal Settings sub menus. How to get back to your Home Screen. And you told me you were too old to learn! If you really are too old to learn, better check your pulse because it’s probably stopped.
3. Where Are The Apps?
Where will I find all the Apps? “App” is short for the word application. What we once called a programme and what our cousins in the USA call a program. This is part of the dumbing down of language, and can be seen taken to its extreme in texting IMO (in my opinion).
Your apps are stored in an area called the App Drawer. Sometimes you will find an icon on the Home Screen that will open this up. It may look like one of these.

Or you may not have an icon to take you there.
To get to the App Drawer tap on the App Drawer icon if you have one. If you don’t see the icon, stroking up from the bottom of the screen, or from one of the sides may reveal the App Drawer.
Once you have the Drawer revealed, stroking right or left should reveal more pages of icons. Because I have lots of apps, my drawer covers four pages. To start an app just tap its icon.
To return to the Home page tap the Home page icon (centre bottom of the screen).
4. Difference Between Power Off and Sleep.
Many new users are confused by this, and can’t work out why their battery goes flat sometimes, and at other times lasts for days.
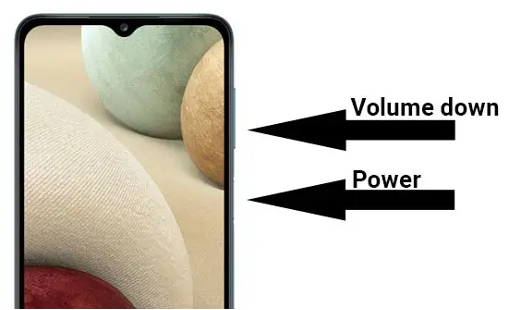
You need to work out which is the power button on your phone. On my phone there are three buttons on the right side of the phone. The top two smaller buttons are the volume up/down, and the larger blue button is the power button (and this doubles as a fingerprint reader, to unlock the phone).
Tapping the power button puts the phone into sleep mode. This means the phone is locked, but incoming calls will arrive. To make a call you will need to unlock the phone (see the next section on security).
If you hold the power button for a few moments the phone will enter the power off and/or restart mode. To turn it off tap the Power Off icon. The phone will then turn off, and no calls will be received. But the battery will last a lot longer. So you need to think about your phone usage when choosing between sleeping or turning off.
If you want to restart your phone (for example, it may not be operating properly) then tap the Restart button. This will restart your phone, and ask you to unlock your phone (log in).
My phone also offers me a third choice from the Power Off screen, Emergency Mode.
Emergency Mode enables you to extend your device’s standby time when you are in an emergency situation and you want your device to conserve power for as long as possible. So, if your power goes off, or you are lost in the bush, this may enable you to extend the phone standby time. Could be handy.
Bonus tip: On my phone, clicking the power button and volume down buttons simultaneously will take a screenshot of the phone screen, and store this in your pictures. This can be really handy if you want to show someone something puzzling that is occurring on your phone.
5. Phone Security.
New smart phones don’t hold much of value, but they quickly start to accumulate stuff that could interest crooks, the police or a nosy spouse. And you may add apps like a banking app that really should be private. It’s a good idea to secure your phone.
Initially most phones come with no unlock key, or they unlock at a simple swipe across the screen. That’s fine when it’s new, but not so hot when you start to accumulate valuable data.
Your phone may come with several ways to unlock it, and you need to choose which is convenient (and which you can remember).
You will find the security in the Settings area. On my phone it’s in the Lock Screen area in Settings, and the Screen Lock Type sub menu.
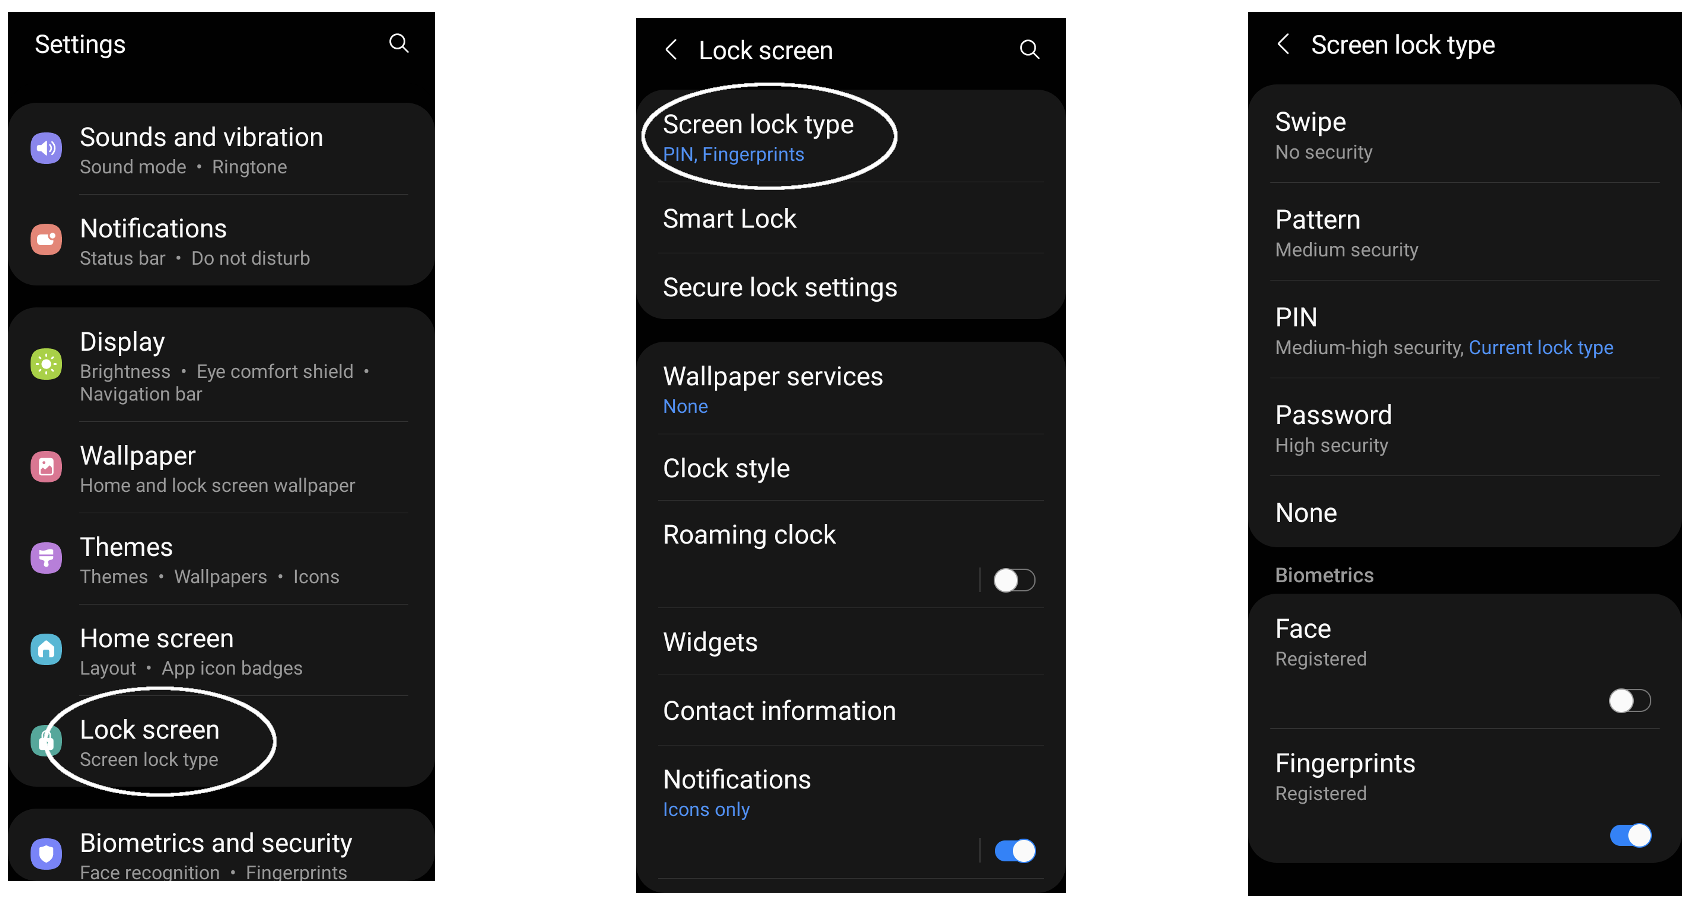
You can add a PIN or a password, but not both. I use a PIN. You can use a fingerprint or a face (these are known as biometrics). I prefer a fingerprint (actually a thumb print). My face doesn’t seem to work. Many phones will allow more than one biometric log in method, maybe in case you accidentally chop off a finger. Some phones use the power button to read the fingerprint. Others use a position on the screen. Consult your user manual. (Now you know what people who write RTFM mean!)
The fingerprint or face print may not be available on all phones. I strongly, strongly suggest you use a PIN or password as well as a finger or face print. It would be very inconvenient if your phone refused to recognise your biometric log in (it apparently happens),
I also strongly suggest you write down and store your PIN or password. Store it securely (remember that nosey spouse I mentioned earlier). We have a small document safe that is bolted to the house framing, hidden in a cupboard.
When you chose your security method just follow the on screen instructions. Because each phone is different it’s impractical to try and give instructions for each method. You can swap between PIN and password.
Additionally, you can use a pattern log in. I’ve never taken to this as your finger leaves a trail which might be readable. I have a PIN and thumb print, and this works well for me.
Try it and see what you think.
6. Getting on The Internet.
Your phone needs to connect to the internet to do most ‘stuff’. There are two ways you can connect to the internet. Over the mobile phone network, or by Wi-Fi to your home or other network.
Let’s talk about your home Wi-Fi network. This assumes you have internet piped into your home already, and distributed via Wi-Fi (this is a short distance radio network). Maximum distance is probably around 50 metres for 2.4 GHz or 15 metres for 5 GHz. Stuff in the way of signals such as walls, refrigerators etc. will cut the distance down.
If you have Wi-Fi available it’s simple to connect, but in most cases, you need to know the Wi-Fi password.
Go to Settings, Connections, Wi-Fi. Ensure Wi-Fi is enabled (probably via an on/off slider on most phones).
From the list of available networks pick the one you wish to join. Enter the password and also select auto reconnect if you intend to rejoin the network the next time you are close by. Then tap the Connect button. Provided you entered the password correctly, your phone should connect to the network.
Please be aware that passwords are sensitive to capitalisation. Also 0 (zero) and O (Capital Oh), Q (capital Queue) and other letters and numbers can easily be misread. Putting the wrong password in is the number one mistake I see causing connection problems.
That’s enough about the early frustrations. Tell me if you have other favourites.


