Table of Contents
This series is designed to help people to understand modern technology, and become more confident in using computing devices. It is not designed to educate experts.
The author is involved in tutoring older students at SeniorNet, a New Zealand wide organisation. SeniorNet hopes that students will feel more confident in using their computing devices as a result of the learning opportunities offered. This series of articles shares that hope.
I recently wrote an article about encrypting email using the built in Thunderbird system. Thunderbird doesn’t suit everybody, so today I’m going to explore another approach to the same problem. This uses the same PGP (pretty good privacy) encryption, with a front end called Kleopatra. Kleopatra is part of the open source KDE suite of programmes.
This will work on both Microsoft Windows and Linux computers. I will talk about Mac computers at the end of this article.
What is PGP and Kleopatra?
Pretty Good Privacy (PGP) is an encryption system (encryption is the method by which information is converted into secret code that hides the information’s true meaning) used for both encoding and decoding sensitive files. Since its invention in 1991 PGP has become the de facto standard for encryption security.
PGP uses two keys. A public key is given out to anyone who may want to encrypt a file. A private key held by only one person is used to decrypt the file and return it to its original form.
There is a comprehensive handbook for using this system which you can view and download here.
This will enable you to send and receive secure messages via email. You can also use it to password protect documents on your computer.
Installing Kleopatra on Microsoft Windows: This works for Windows 7 or newer versions.
1. In your browser, go to Gpg4win. Click the big green button to download the installer.
2. Run the installer. This will install the PGP engine and Kleopatra GUI (graphical user interface) front end, the part we will be using. You don’t need to install GPA or browser integration when offered.
3. When installation is complete start Kleopatra.
Installing Kleopatra on Linux:
1. Open your package manager and search for Kleopatra.
2. Click Install if not already installed on your system. This will install Kleopatra and the required PGP engine.
3. When installation is complete start Kleopatra.
You are now ready to create a key pair. This will be used to encrypt and decrypt files. You cannot encrypt folders directly, but there is a work around to do this.
Create a Key Pair:
You can import your keys created in Thunderbird (see my first article on this subject), or you can create new keys. To create new keys:
1. Open Kleopatra
2. Click on File/New OpenPGP Key Pair
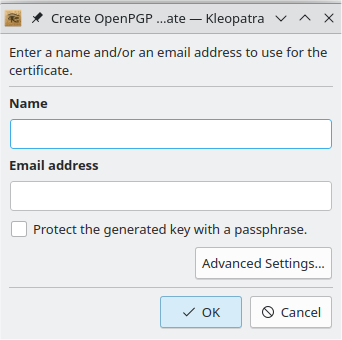
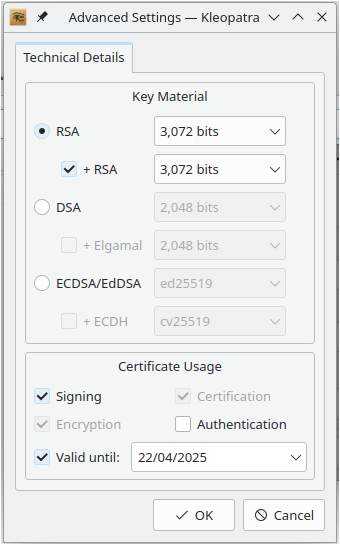
3. In the pop up, enter the Name and Email address for the new key pair. Both of these fields are optional, but will help you to identify the correct pair. Also tick “Protect the generated key with a passphrase.” A passphrase is just a password. See the following examples of the Create and Advanced Settings pop up windows.
4. In the advanced settings use the defaults for average security. Use 4096 bits instead of 3,072 if you are guarding nuclear secrets. It would take a classical computer around 300 trillion years to break a RSA-2048 bit encryption key. Quantum Computers will be much faster, but they are years away yet!
5. Click OK and generate the keys. You may get warnings about the strength of your passphrase; just do what you want within the requirements of your security.
The keys will be generated.


Backing up your keys: This is a wise move as the loss of keys could mean the loss of access to confidential emails. There is a dialogue to back up your keys at the time of creation. Just follow the prompts. Here’s how to back up keys if you want to do this later.
Public keys.
1. Open Kleopatra
2. Click Certificates tab if not already selected.
3. Right click on the name of the key you wish to back up
4. Choose Export
5. Navigate to a suitable destination, and click Save. Job done.
6. Print the key if you want a printed copy.
7. Transfer the key file to a suitable medium (CD, DVD or USB) if desired.
Private Keys.
1. Open Kleopatra
2. Click Certificates tab if not already selected.
3. Right click on the name of the key you wish to back up.
4. Select Backup Secret Keys in the resulting pop up window.
5. Navigate to a suitable destination. Click Save
6. Enter the passphrase to show authorisation. Click OK
7. Print the key if you want a printed copy.
8. Transfer the key file to a suitable medium (CD, DVD or USB) if desired.
9. Delete the key from your computer
10. Securely store the key. I use a document safe. You could lodge it with your solicitor or bank (if they still offer this facility).
Exchanging Keys:
To allow the system to work you need to provide the party who will send the document the public key of the party who will receive and decrypt the document. This can be done using email or in person.
Open Kleopatra, select Certificates tab, right click on your name and select Export.
Export the key to your desktop. Attach this file to an email to the party you want to send you encrypted files.
Once received by the other party, they need to open this key in a text editor (Notepad for Windows, Kate for KDE Linux), copy and paste the key to clipboard. In the top menu, open Tools/Clipboard/Certificate Import. Click Import and enter your passphrase. Done.
Encrypting and Decrypting.
You are now ready to exchange that secret data.

1. Using Clipboard – Encrypt
- Start Kleopatra
- Copy your message to the computer’s clipboard
- Click Tools/Clipboard/Encrypt in Kleopatra
- Click Add Recipient button on the pop up window
- Add recipient from the list of recipients.
- Click OK
- Click Next. You will see a message that the clipboard contents are encrypted
- Open Email write pane or text editor
- Paste clipboard (Ctrl/v). This is the entire encrypted message.
– Decrypt
- Start Kleopatra
- Copy the message to the computer’s clipboard
- Click Tools/Clipboard/Decrypt/Verify in Kleopatra
- Open text editor
- Paste clipboard (Ctrl/v). This is the entire decrypted message.
2. Using a Saved Document – Encrypt
(You can encrypt most document types using this method.)
- Start Kleopatra
- Click Sign/encrypt icon
- Navigate to the file to be encrypted and click on the file.
- In the pop up click Sign/Encrypt
- Enter your passphrase and click OK
- Confirming message will appear. A file will be created in the same folder as your original file, with a file name with the extension .gpg. This is the entire encrypted message.
- Email this as an attachment to the recipient
– Decrypt
- Save the document from the email
- Start Kleopatra and select Certificates Icon
- Click Decrypt/Verify Icon
- Navigate to the file to be decrypted and click on the file.
- File will be decrypted and a confirming message displayed
- Click to save the document, and choose the desired document name (usually the original file name).
- File will be created containing the original contents. This is the entire decrypted message.
If you want to encrypt a folder with contents, first zip the folder. Then encrypt the resulting zipped folder. When decrypted, unzip to display the folder contents. This is how you send multiple documents with only one encrypt/decrypt.
Using PGP on Apple Mac
As promised, here is the information on using this with a Mac. I haven’t tried this myself, not having access to Apple equipment. I would welcome feedback from any BFD readers with the requisite computer.
Here is a video showing how to encrypt and decrypt a file on Mac computers. I apologise in advance for this video, made by the appalling Victor Dozal, but it has the information we need.
Apple Mac doesn’t have the ability to encrypt/decrypt via the clipboard that is present with Windows and Linux. But you can use the features to interact with other Mac users, and also with Windows and Linux users.


