
Table of Contents
This series is designed to help people to understand modern technology, and become more confident in using computing devices. It is not designed to educate experts.
The author is involved in tutoring older students at SeniorNet, a New Zealand wide organisation. SeniorNet hopes that students will feel more confident in using their computing devices as a result of the learning opportunities offered. This series of articles shares that hope.
Disclosure: This is the most difficult article I’ve ever written. Probably because I’m passionate about the subject. Because of the subject matter, it’s been difficult to keep to a reasonable size.
As the system requirements for Microsoft Windows increase and more and more security “bolt ons” are required to make the latest offering “the most secure Windows ever”, there are a number of laptops, and desktops, that just don’t make the cut.
You have only a limited choice of uses with these computers, and sadly many of them either take up space in the back of cupboards or end up as landfill scrap. If the computers still work, there can be life after Windows, however. You don’t need to scrap that computer that won’t run the latest and greatest Windows.
If you have an unused computer why not use it to run the Linux operating system? You could resurrect an old computer, give it new life and use it or donate it to someone who needs the equipment. And along the way you may find the pleasure of using a computer that doesn’t continually frustrate you with pop-up security warnings, unexpected updates, required restarts, miscellaneous adverts and all the other things that make life with Microsoft so “interesting”. And let’s not forget the 300,000 plus new Windows malwares every day just waiting to mug your computer.
I’ve done this change to Linux many times now, and while the installation is generally trouble-free (for me) there are several areas not well covered by instructional videos. That’s what I will talk about today, in the hope that it will make the installation pain-free. So, get ready.
The usual advice given for Linux installation is to download the iso, burn it to USB, run it and install Linux.
That looks simple, but there are a number of fishhooks hidden in the above sentence. Let’s see if I can smooth the way a little, and perhaps demystify the process.
1. Which Linux to use? Unlike Windows and Mac, there are hundreds of different flavours of Linux. For this exercise, I will be using Linux Mint with a Cinnamon desktop, 64 bit edition. Lots of words, don’t worry about them. It just means we are going to use a particular make and model of Linux. I’ve chosen this one because it will look familiar to people who have used Microsoft Windows. Also, it is most likely to co-operate with Wi-Fi and printers.
Hidden in the above is the mention of 64 bit. This has to do with computer architecture, and the majority of computers built since January 2007 have been 64 bit. My article refers specifically to these computers.
How to tell if you have a 32 or 64 bit computer. There are a number of Youtube videos. Try this one.
Sorry about the ads. Sometimes the stickers on the computer case will also tell you if it’s a 64 bit box.
If your computer reports as not being 64 bit, I’m sorry but this article won’t work for you.
2. How to get Linux Mint Cinnamon 64 bit. You need a computer to download the file.
Download from here. This is a 2.3 GB download from The University of Canterbury in New Zealand. I’ve used this link because it’s local, and will probably be the fastest. Quick and easy are the aims today.
3. Burn the iso to USB. The iso is the file type you just downloaded. It’s literally the Linux system in one file.
You need an unused USB drive at least 4GB in size. Any data, files, photos etc. will be destroyed, so make sure you choose a USB with nothing important on it.
We will use a programme called BalenaEtcher. Download BalenaEtcher from here. The website is intelligent, and should recognise your current computer operating system. Store this in your downloads folder as well.
A YouTube video on how to use BalenaEtcher is here. It tells you, then shows you how. Just watch the first 35 seconds of the video. This is the simplest programme I’ve seen for this action.
Other burning apps you could use are Rufus and Unetbootin.
4. The missing (or fudged) step. This step is the tricky one, and the one most likely to be skipped over in the “How to” instructions. We need to ensure your computer can properly load its Linux operating system. Because each computer is set up differently the instruction here must be somewhat general.
Please pay attention.
We need to access the computer’s start-up screen and amend two settings. Getting it wrong can cause your computer to become unresponsive, so be careful.
The BIOS setup is accessed right at the start when your computer is powered up. To do this you need to repeatedly press a certain key as soon as you power the computer up.
The technique is different on different computers. Often the key press necessary shows up briefly during startup, in the lower left of the screen.
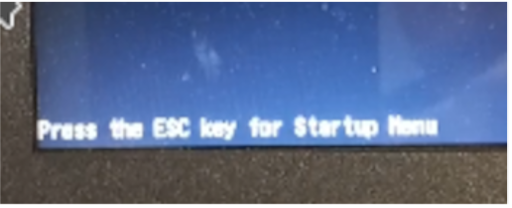

(Sorry about the poor quality photos, difficult to photograph the screen with a phone camera).
If you can’t see this, try a YouTube or Google search for Enter BIOS setup for (make of computer)
When you know the required key, insert your Linux USB, then power up the computer and repeatedly press that key. You may need a couple of tries to get it right. Pressing the power key for five seconds will turn your computer off if you need to retry this step.
Once you have accessed the BIOS setup you need to locate the two settings and change them.
PRO TIP. Before you change anything, photograph the screen with your phone camera. This will give you a record of how to revert settings, should you wish to.
You need to amend the boot to legacy boot, should it not already be set thus. See this video for an Acer laptop.
Once you’ve done that you need to locate the area to ensure the Linux USB is the first drive accessed when the computer starts (this is why you inserted the USB before starting the computer).
Here is what my Acer laptop looks like. Yours may be different, and you may need to hunt for this setting. Use the adjacent instructions to bring the Linux USB to the top of the list.
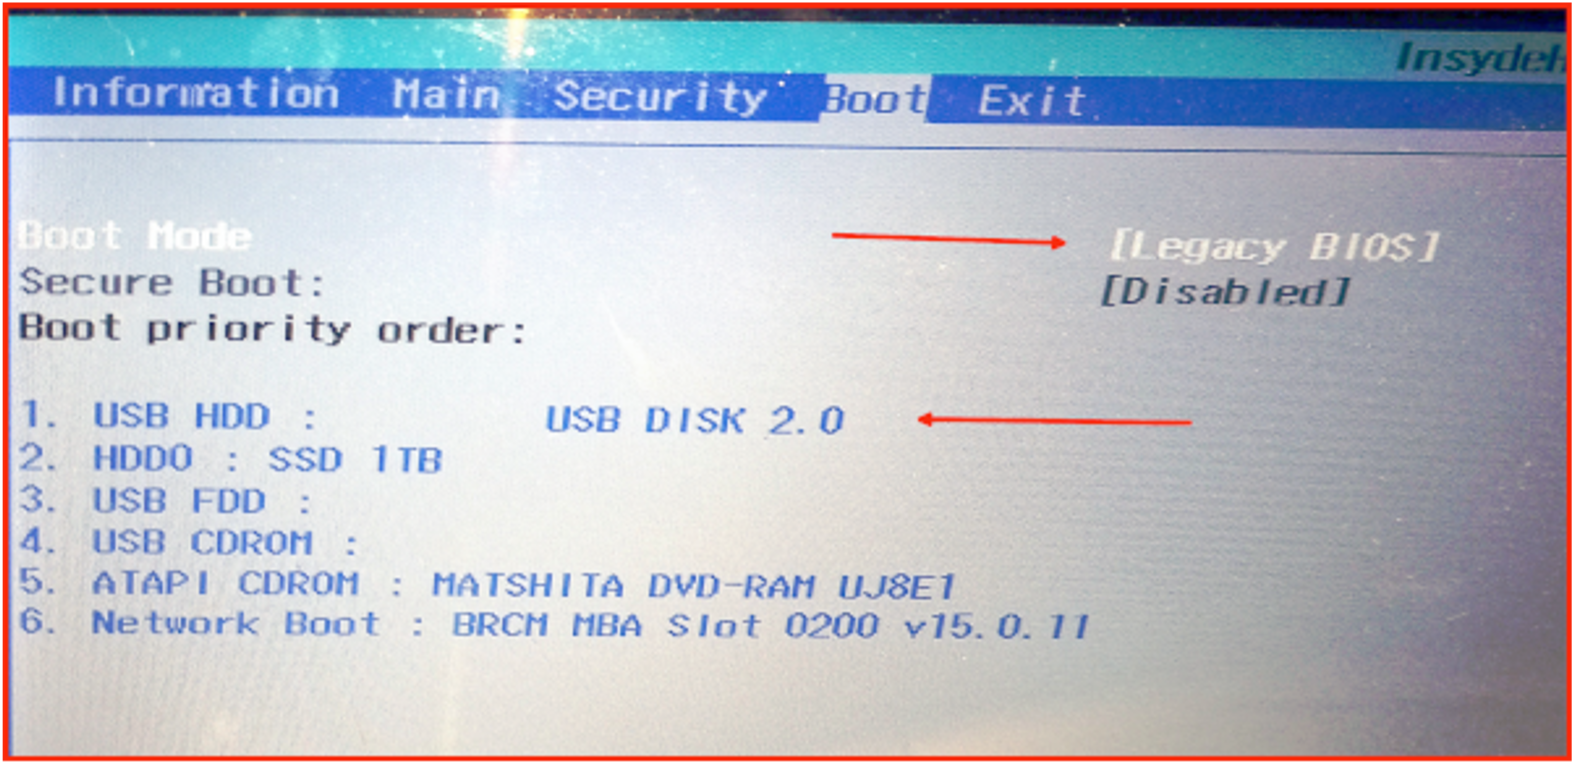
Once that’s done, use the arrow keys to move to Exit in the top menu and confirm the changes (typically by pressing F10 key) and you’ve just completed the trickiest part of the installation.
Your system should now restart. Here is a list of the choices you will be offered, and what you should choose.
GNU Grub – Choose the top item (with arrow keys) and press Enter
5. Time for a Test Drive
When the desktop appears, click on Wi-Fi in the system tray, locate your Wi-Fi and input the Wi-Fi password. Your Wi-Fi should establish a connection. Use the same Wi-Fi as is used for your printer, if it’s connected to Wi-Fi.
If your printer is turned on and connected to the same Wi-Fi channel as you’ve just connected to, you have every chance that your printer will also “just connect”. It can’t get easier than that!
Click the Firefox icon in the bottom panel to ensure your internet works, and type in your favourite website in the browser address box (if you’ve forgotten it, it’s thebfd.co.nz).
Check that the track pad is working. Tapping once on the trackpad is equivalent to left-clicking your mouse.
Close Firefox and return to the desktop.
5. Install Linux Mint.
If your internet and printer are OK, it’s time to install Linux. Towards the top left of the screen you will find an icon which says “Install Linux Mint”. Double-click this icon.
You will now be offered a series of screens, with choices. Choose as follows.
Choose English (or your native language) and click Continue.
Choose US English keyboard (unless you use something else), click Continue.
Tick Install Multimedia Codecs and click Continue.
Choose Erase disk and install Linux Mint, and Install Now (Up to here you could cancel the installation. Now any data on the computer will be overwritten and lost. Are you sure you wish to proceed?).
Write the changes to disks? Click Continue.
Select time zone and click Continue (NZ is usually auto selected).
Type your name, and a password to use for the computer. Make sure “Require My Password to Log In” is selected. Click Continue.
The installation will now proceed with no other input required from you.
When installation is complete, click Restart Now and follow the on screen instructions. Type in your password and click Enter. You should be delivered to a desktop which you will be familiar with from your Windows days.
Click the icon in the bottom left of the screen to reveal the menu. Lots of free installed software here for you to play with.
Enjoy your resurrected laptop or computer. And wait for the follow-up article.


